
第1页 / 共2页
试读已结束,还剩1页,您可下载完整版后进行离线阅读
THE END
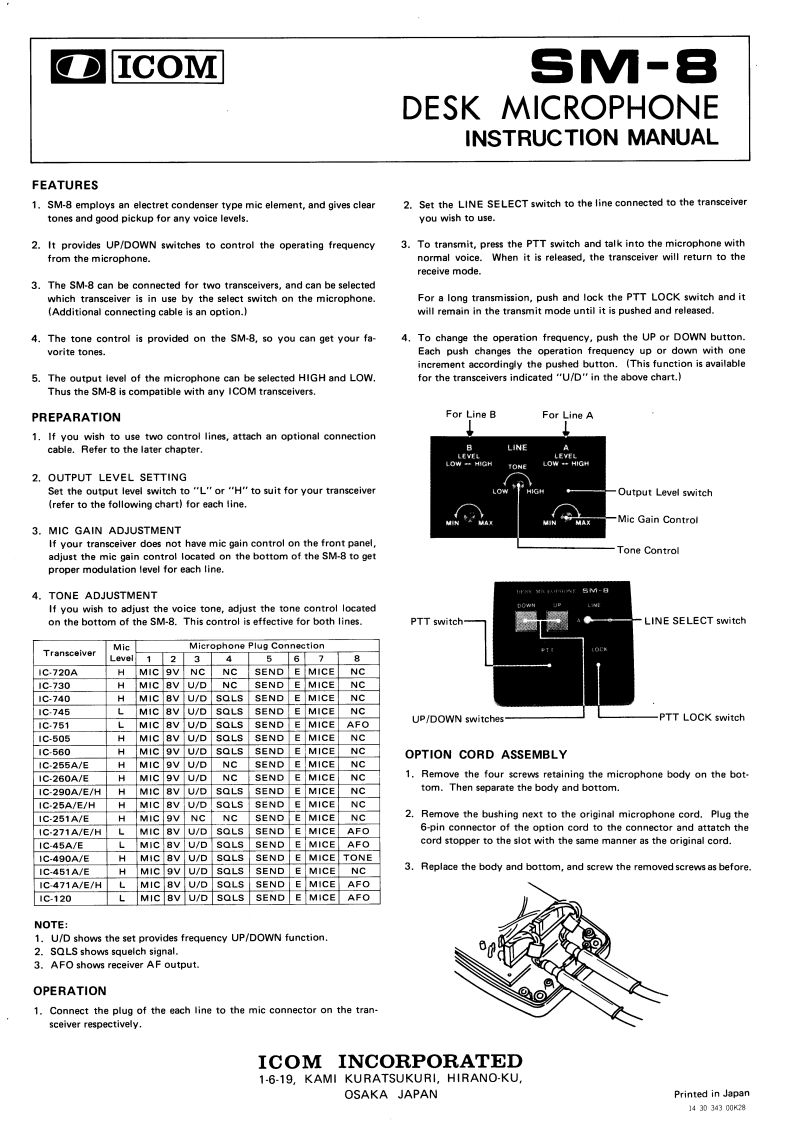
ICOMSM-8DESK MICROPHONEINSTRUCTION MANUALFEATURES1.SM-8 employs an electret condenser type mic element,and gives clear2.Set the LINE SELECT switch to the line connected to the transceivertones and good pickup for any voice levels.you wish to use.2.It provides UP/DOWN switches to control the operating frequency3.To transmit,press the PTT switch and talk into the microphone withfrom the microphone.normal voice.When it is released,the transceiver will return to thereceive mode.3.The SM-8 can be connected for two transceivers,and can be selectedwhich transceiver is in use by the select switch on the microphone.For a long transmission,push and lock the PTT LOCK switch and it(Additional connecting cable is an option.)will remain in the transmit mode until it is pushed and released.4.The tone control is provided on the SM-8,so you can get your fa-4.To change the operation frequency,push the UP or DOWN button.vorite tones.Each push changes the operation frequency up or down with oneincrement accordingly the pushed button.(This function is available5.The output level of the microphone can be selected HIGH and LOW.for the transceivers indicated "U/D"in the above chart.)Thus the SM-8 is compatible with any ICOM transceivers.PREPARATIONFor Line BFor Line A1.If you wish to use two control lines,attach an optional connectioncable.Refer to the later chapter.LINELOW-HIGHLOW+HIGH2.OUTPUT LEVEL SETTINGSet the output level switch to "L"or "H"to suit for your transceiver4GOutput Level switch(refer to the following chart)for each line.Mic Gain Control3.MIC GAIN ADJUSTMENTIf your transceiver does not have mic gain control on the front panel,adjust the mic gain control located on the bottom of the SM-8 to getTone Controlproper modulation level for each line.4.TONE ADJUSTMENTIf you wish to adjust the voice tone,adjust the tone control locatedon the bottom of the SM-8.This control is effective for both lines.PTT switchLINE SELECT switchMicMicrophone Plug ConnectionTransceiverLevel12345678IC-720AHMIC 9V NCNCSEND EMICENC1C-730HMIC BV U/DNCSEND EMICENC1C-740HMIC BVU/DSOLS SENDEMICENC1c745MIC 8VU/D SOLS SENDEMICENCUP/DOWN switches-PTT LOCK switch1C-751LMIC 8VU/D SQLSSENDEIMICEAFO1C-505HMIC BV U/D SOLS SENDMICENC1C-560HMIC 9V U/D SQLSSENDEMICENCOPTION CORD ASSEMBLY1C.255A/EHMIC 9V U/DNCSENDEMICENC1C-260A/EHMIC 9V U/DNCSENDEMICENC1.Remove the four screws retaining the microphone body on the botIC-290A/E/HHMIC 8V U/D SQLSSENDEMICENCtom.Then separate the body and bottom.IC-25A/E/HHMIC 8V U/DSQLSSENDMICENC1C-251A/EHMIC 9VNCNCSENDEMICENC2.Remove the bushing next to the original microphone cord.Plug the1C271A/E/HMIC 8VU/DSQLSSENDEMICEAFO6-pin connector of the option cord to the connector and attatch the1C-45A/EMIC8V U/DSQLSSENDMICEAFOcord stopper to the slot with the same manner as the original cord.1C-490A/EHMIC BVU/DSQLSSENDMICETONE1C-451A/EMIC 9V U/DSQLSSENDMICENC3.Replace the body and bottom,and screw the removed screws as beforeIC-471A/E/HMIC 8V U/D SQLSSENDEMICEAFO1C-120MIC 8

请登录后查看评论内容