
第1页 / 共2页
试读已结束,还剩1页,您可下载完整版后进行离线阅读
THE END
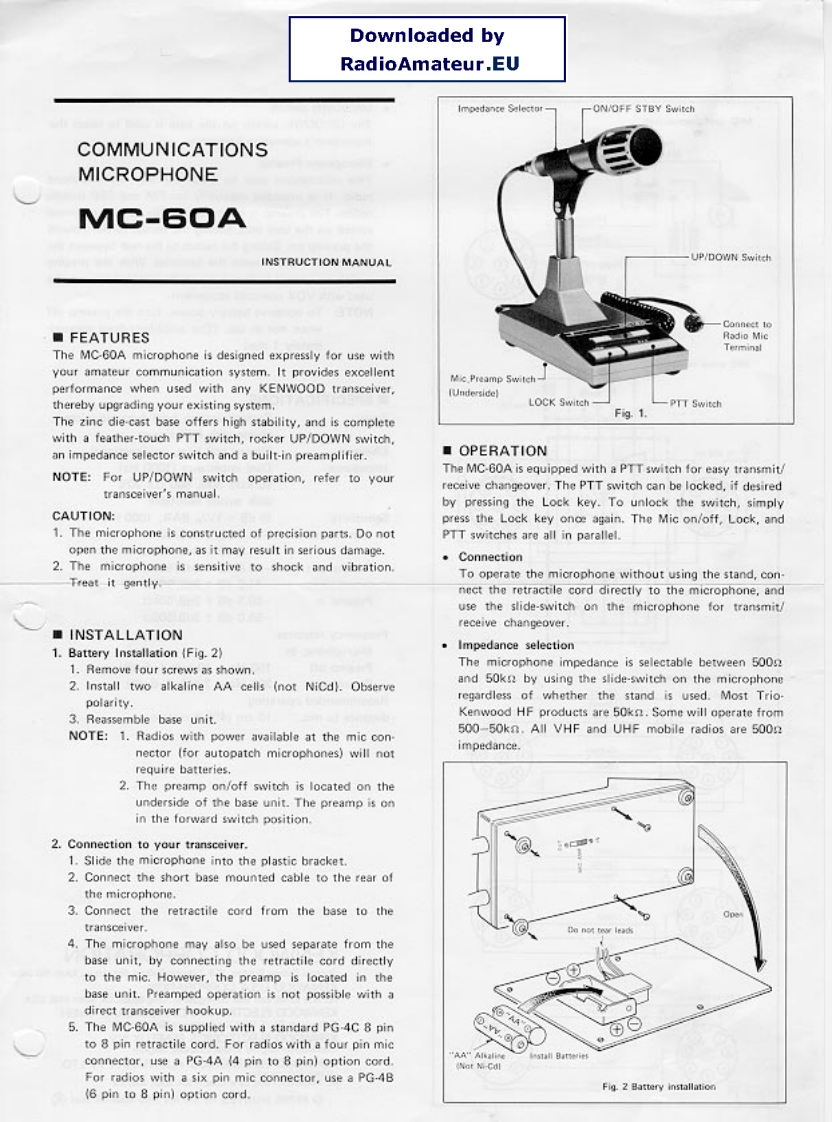
Downloaded byRadioAmateur.EUImpedance Selector--ON/OFF STBY SwitchCOMMUNICATIONSMICROPHONEMC-6▣AINSTRUCTION MANUAL-UP/DOWN SwitchConneet to■FEATURESRadio MicTerminalThe MC-60A microphone is designed expressly for use withyour amateur communication system.It provides excellentMic.Preamp Switchperformance when used with any KENWOOD transceiver,[Undersidelthereby upgrading your existing system.LOCK Switch-一PTT SwitchFig.1.The zinc die cast base offers high stability,and is completewith a feather-touch PTT switch,rocker UP/DOWN switch,an impedance selector switch and a built-in preamplifier.■OPERATIONNOTE:For UP/DOWN switch operation,refer to yourThe MC-6OA is equipped with a PTT switch for easy transmit/receive changeover.The PTT switch can be locked,if desiredtransceiver's manual.by pressing the Lock key.To unlock the switch,simplyCAUTION:press the Lock key onoe again.The Mic on/off,Lock,and1.The microphone is constructed of precision parts.Do notPTT switches are all in parallel.open the microphone,as it may result in serious damage.·Connection2.The microphone is sensitive to shock and vibration.Treat it gentlyTo operate the microphone without using the stand,con-nect the retractile cord directly to the microphone,anduse the slide-switch on the microphone for transmit/receive changeover.■INSTALLATION·Impedance selection1.Battery Installation (Fig.2)1.Remove four screws as shown.The microphone impedance is selectable between 500g2.Install two alkaline AA cells (not NiCd).Observeand 50kn by using the slide-switch on the microphonepolarity.regardless of whether the stand is used.Most Trio-3.Reassemble base unit.Kenwood HF produets are 50kn.Some will operate fromNOTE:1.Radios with power available at the mic con.500-50kn.All VHF and UHF mobile radios are 500simpedancenector (for autopatch microphones)will notrequire batteries.2.The preamp on/off switch is located on theunderside of the base unit.The preamp is onin the forward switch position.2.Connection to your transceiver.1.Slide the microphone into the plastic bracket.2.Connect the short base mounted cable to the rear ofthe microphone.3.Connect the retractile cord from the base to thetransceiver.4.The microphone may also be used separate from thebase unit.by connecting the retractile cord directlyto the mic.However,the preamp is located in thebase unit.Preamped operation is not possible with adirect transceiver hookup.5.The MC-60A is supplied with a standard PG-4C 8 pinto 8 pin retractile cord.For radios with a four pin mic.v.coconnector,use a PG-4A (4 pin to 8 pin)option cord.Nat N-CdlFor radios with a six pin mic connector,use a PG-4B(6 pin to 8 pin)option cord.Fig.2 Battery installation

请登录后查看评论内容