
第1页 / 共2页
试读已结束,还剩1页,您可下载完整版后进行离线阅读
THE END
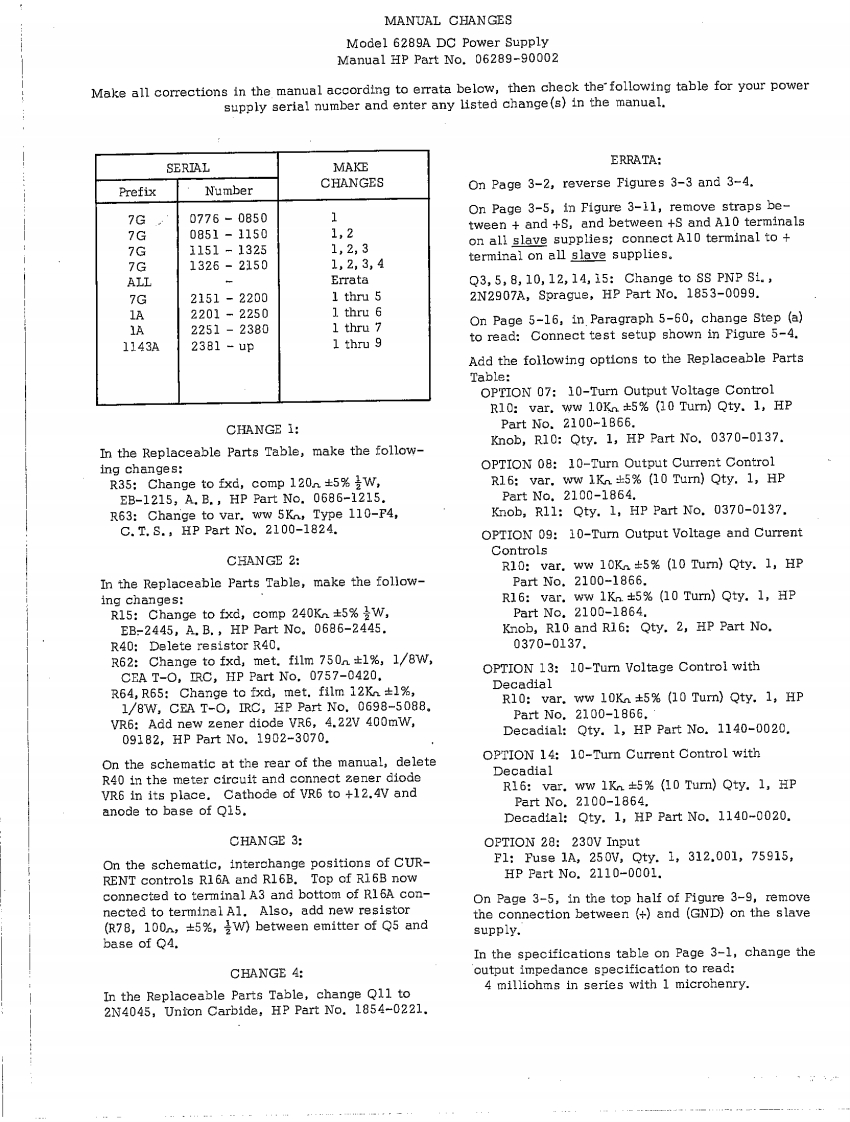
MANUAL CHANGESModel 6289A DC Power SupplyManual HP Part No.06289-90002Make all corrections in the manual according to errata below,then check the'following table for your powersupply serial number and enter any listed change(s)in the manual.SERIALMAKEERRATA:CHANGESPrefixNumberOn Page 3-2,reverse Figures 3-3 and 3-4.On Page 3-5,in Figure 3-11,remove straps be-7G0776-0850tween and +S,and between +S and Al0 terminals7G0851-11501,27G1151-13251,2,3on all slave supplies;connect Al0 terminal to1,2,3,4terminal on all slave supplies.7G1326-2150ALLErrataQ3,5,8,10,12,14,15:Change to SS PNP Si.,7G2151-22001 thru 52N2907A,Sprague,HP Part No.1853-0099.1A2201-22501.thru 6IA2251-23801 thru 7On Page 5-16,in.Paragraph 5-60,change Step (a)1143A2381-up1 thru 9to read:Connect test setup shown in Pigure 5-4.Add the following options to the Replaceable PartsTable:OPTION 07:10-Turn Output Voltage ControlR10:var.ww 10Kn5%(10 Turn)Qty.1,HPCHANGE 1:Part No.2100-1866.Knob,R10:Qty.1,HP Part No.0370-0137.In the Replaceable Parts Table,make the follow-ing changes:OPTION 08:10-Turn Output Current ControlR35:Change to fxd,comp120n±5%是W,R16:var.ww 1Kn.5%(10 Turn)Qty.1,HPEB-1215,A,B.,HP Part No.0686-1215.Part No.2100-1864.R63:Change to var.ww 5Kn,Type 110-P4,Knob,R11:Qty.1,HP Part No.0370-0137.C.T.S.,HP Part No.2100-1824.OPTION 09:10-Turn Output Voltage and CurrentControlsCHANGE 2:R10:var.ww 10Kn5%(10 Tur)Qty.1,HPIn the Replaceable Parts Table,make the follow-Part No.2100-1866.ing changes:R16:var.ww 1Kn+5%(10 Turn)Qty.1,HPRl5:Change to fxd.,comp240Kn±5%是W,Part No.2100-1864.EB-2445,A.B.,HP Part No。0686-2445.Knob,R10 and R16:Qty.2,HP Part No.R40:Delete resistor R40.0370-0137.R62:Change to fxd,met.film750n±1%,1/8w,CEA T-O,IRC,HP Part No.0757-0420,OPTION 13:10-Turn Voltage Control withR64,R65:Change to fxd,met.film12K±1%,Decadial1/8W,CEA T-O,IRC,HP Part No.0698-5088.R10:var.ww 10Kn+5%(10 Turn)Qty.1,HPVR6:Add new zener diode VR6,4.22V 400mW,Part No.2100-1866.091B2,HP Part No..1902-3070.Decadial:Qty.1,HP Part No.1140-0020.On the schematic at the rear of the manual,deleteOPTION 14:10-Turn Current Control withR40 in the meter circuit and connect zener diodeDecadialVR6 in its place.Cathode of VR6 to +12.4V andR16:var.ww 1Kn5%(10 Turn)Qty.1,HPanode to base of Q15.Part No.2100-1864.Decadial:Qty.1,HP Part No.1140-0020.CHANGE 3:OPTION 28:230V InputOn the schematic,interchange positions of CUR-F1:use1A,250V,Qty.1,312.001,75915,RENT controls R16A and R16B.Top of R16B nowHP Part No.2110-0001.connected to terminal A3 and bottom of R16A con-On Page 3-5,in the top half of Figure 3-9,removenected to terminalAl.Also,add new resistorthe connection between (+and (GND)on the slave(R7B,100n,±5%,w)between emitter of Q5andsupply.base of Q4.In the specifications table on Page 3-1,change theCHANGE 4:output impedance specification to read:In the Replaceable Parts Table,change Q11 to4 milliohms in series with 1 microhenry.2N4045,Union Carbide,HP Part No.1854-0221.


请登录后查看评论内容