
第1页 / 共22页
试读已结束,还剩21页,您可下载完整版后进行离线阅读
THE END
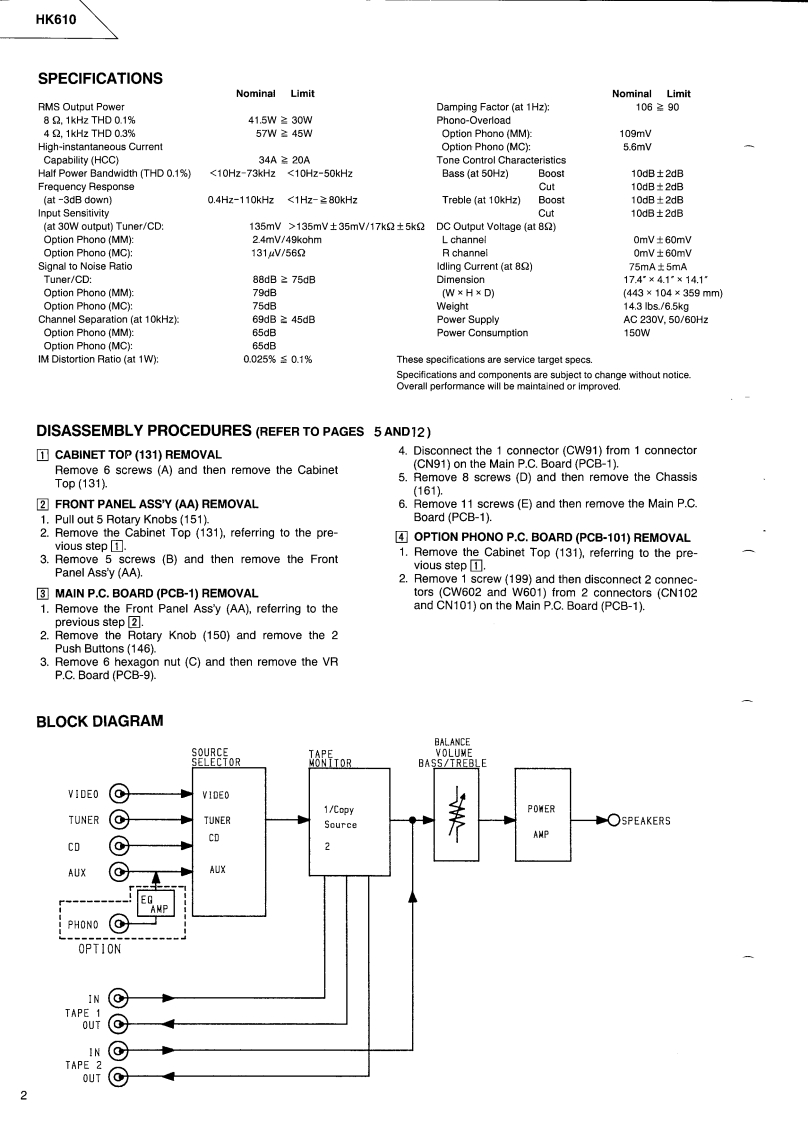
HK610SPECIFICATIONSNominal LimitNominal LimitRMS Output PowerDamping Factor (at 1Hz):106名908 Q,1kHz THD 0.1%41.5W≥30WPhono-Overload4 2.1kHz THD 0.3%57W≥45WOption Phono (MM):109mWHigh-instantaneous CurrentOption Phono(MC):5.6mvCapability (HCC)34A220ATone Control CharacteristicsHalf Power Bandwidth (THD 0.1%)<10Hz-73kHz <10Hz-50kHzBass (at 50Hz)Boost10dB±2dBFrequency ResponseCut10dB±2dB(at -3dB down)0.4Hz-110kHz<1Hz-≥80kHzTreble (at 10kHz)Boost10dB±2dBInput SensitivityCut10dB±2dB(at 30W output)Tuner/CD:135mV>135mV±35mV/17k2±5k2DC Output Voltage (at 8S2)Option Phono(MM):2.4mV/49kohmL channel0mW±60mVOption Phono (MC):131V/562R channel0mV±60mVSignal to Noise RatioIdling Current (at B2)75mA±5mATuner/CD:88dB2 75dBDimension17.4×4.1"×14.1Option Phono (MM):79dBW×HXD)(443×104×359mm)Option Phono (MC)75dBWeight14.3Ibs./6.5kgChannel Separation(at 10kHz):69dB≥45dBPower SupplyAC230V.50/60HzOption Phono (MM):65dBPower Consumption150WOption Phono(MC):65dBIM Distortion Ratio (at 1W):0.025%≤0.1%These specifications are service target specs.Specifications and components are subject to change without notice.Overall performance will be maintained or improvedDISASSEMBLY PROCEDURES (REFER TO PAGES 5 AND12)CABINET TOP(131)REMOVAL4.Disconnect the 1 connector (CW91)from 1 connectorRemove 6 screws (A)and then remove the Cabinet(CN91)on the Main P.C.Board (PCB-1).Top(131)5.Remove 8 screws (D)and then remove the Chassis(161).2]FRONT PANEL ASS'Y (AA)REMOVAL6.Remove 11 screws (E)and then remove the Main P.C.1.Pull out 5 Rotary Knobs (151).Board (PCB-1).2.Remove the Cabinet Top (131),referring to the pre-4OPTION PHONO P.C.BOARD(PCB-101)REMOVALvious step 1.3.Remove 5 screws (B)and then remove the Front1.Remove the Cabinet Top (131),referring to the pre-vious step 1.Panel Ass'y (AA).2.Remove 1 screw (199)and then disconnect 2 connec-3]MAIN P.C.BOARD(PCB-1)REMOVALtors (CW602 and W601)from 2 connectors (CN1021.Remove the Front Panel Ass'y(AA).referring to theand CN101)on the Main P.C.Board (PCB-1).previous step 2.2.Remove the Rotary Knob (150)and remove the 2Push Buttons (146).3.Remove 6 hexagon nut (C)and then remove the VRP.C.Board (PCB-9).BLOCK DIAGRAMBALANCESOURCEVOLUMESELECTORI65RBASS/TREBLEVIDEOVIDEO1/CopyPOWERTUNER@TUNERSourceOSPEAKERSCDANPCD⊙2AUXAUXANPPHONOOPTIONINTAPE 1OUT⊙IN©TAPE 2OUT©2

请登录后查看评论内容