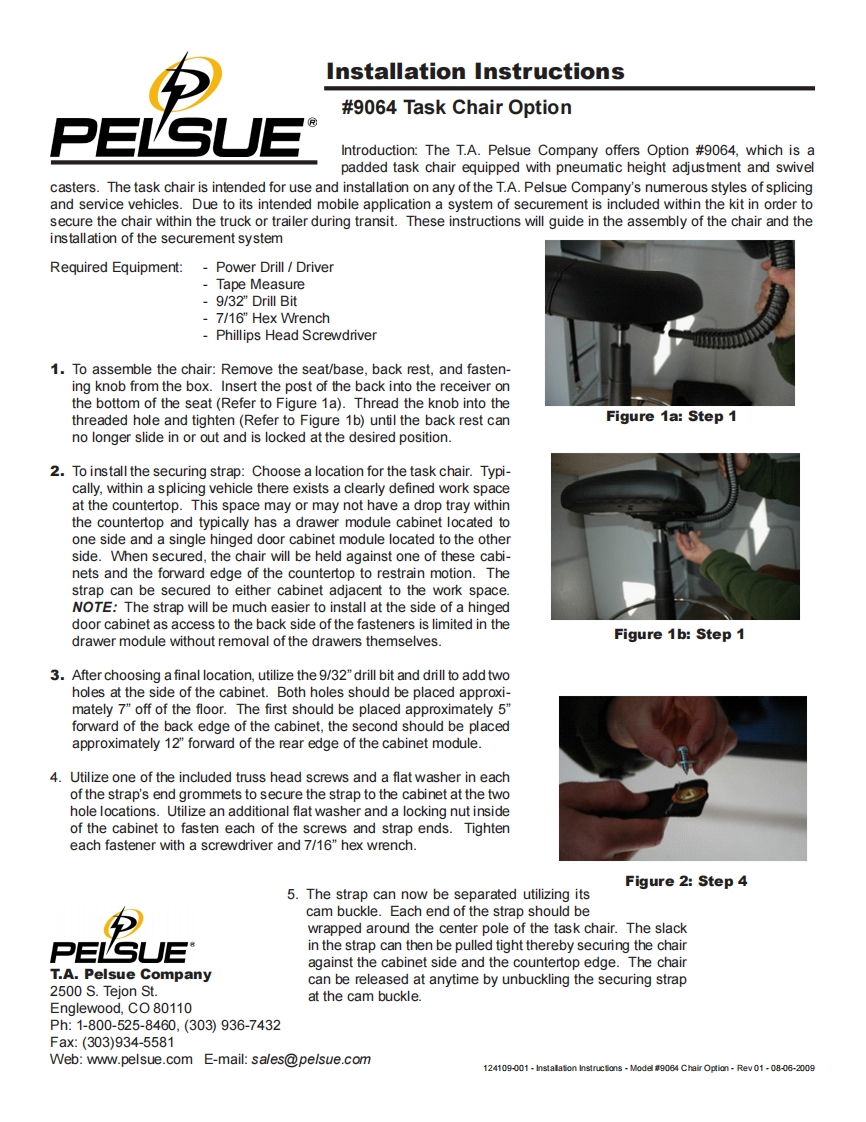
Installation Instructions#9064 Task Chair OptionIntroduction:The T.A.Pelsue Company offers Option #9064.which is apadded task chair equipped with pneumatic height adjustment and swivelcasters.The task chair is intended for use and installation on any of the T.A.Pelsue Company's numerous styles of splicingand service vehicles.Due to its intended mobile application a system of securement is included within the kit in order tosecure the chair within the truck or trailer during transit.These instructions will guide in the assembly of the chair and theinstallation of the securement systemRequired Equipment:Power Drill DriverTape Measure9/32 Drill Bit7/16 Hex WrenchPhillips Head Screwdriver1.To assemble the chair:Remove the seat/base,back rest,and fasten-ing knob from the box.Insert the post of the back into the receiver onthe bottom of the seat (Refer to Figure 1a).Thread the knob into thethreaded hole and tighten (Refer to Figure 1b)until the back rest canFigure 1a:Step 1no longer slide in or out and is locked at the desired position.2.To install the securing strap:Choose a location for the task chair.Typi-cally,within a splicing vehicle there exists a clearly defined work spaceat the countertop.This space may or may not have a drop tray withinthe countertop and typically has a drawer module cabinet located toone side and a single hinged door cabinet module located to the otherside.When secured,the chair will be held against one of these cabi-nets and the forward edge of the countertop to restrain motion.Thestrap can be secured to either cabinet adjacent to the work space.NOTE:The strap will be much easier to install at the side of a hingeddoor cabinet as access to the back side of the fasteners is limited in thedrawer module without removal of the drawers themselvesFigure 1b:Step 13.After choosing a final location,utilize the 9/32"drill bit and drill to add twoholes at the side of the cabinet.Both holes should be placed approxi-mately 7"off of the floor.The first should be placed approximately 5"forward of the back edge of the cabinet,the second should be placedapproximately 12"forward of the rear edge of the cabinet module.4.Utilize one of the included truss head screws and a flat washer in eachof the strap's end grommets to secure the strap to the cabinet at the twohole locations.Utilize an additional flat washer and a locking nut insideof the cabinet to fasten each of the screws and strap ends.Tighteneach fastener with a screwdriver and 7/16"hex wrench.Figure 2:Step 45.The strap can now be separated utilizing itscam buckle.Each end of the strap should bewrapped around the center pole of the task chair.The slackPELSUEin the strap can then be pulled tight thereby securing the chairagainst the cabinet side and the countertop edge.The chairT.A.Pelsue Companycan be released at anytime by unbuckling the securing strap2500 S.Tejon St.at the cam buckle.Englewood,CO 80110Ph:1-800-525-8460,(303)936-7432Fax:(303)934-5581Web:www.pelsue.com E-mail:sales@pe/su

请登录后查看评论内容