
第1页 / 共2页
试读已结束,还剩1页,您可下载完整版后进行离线阅读
THE END
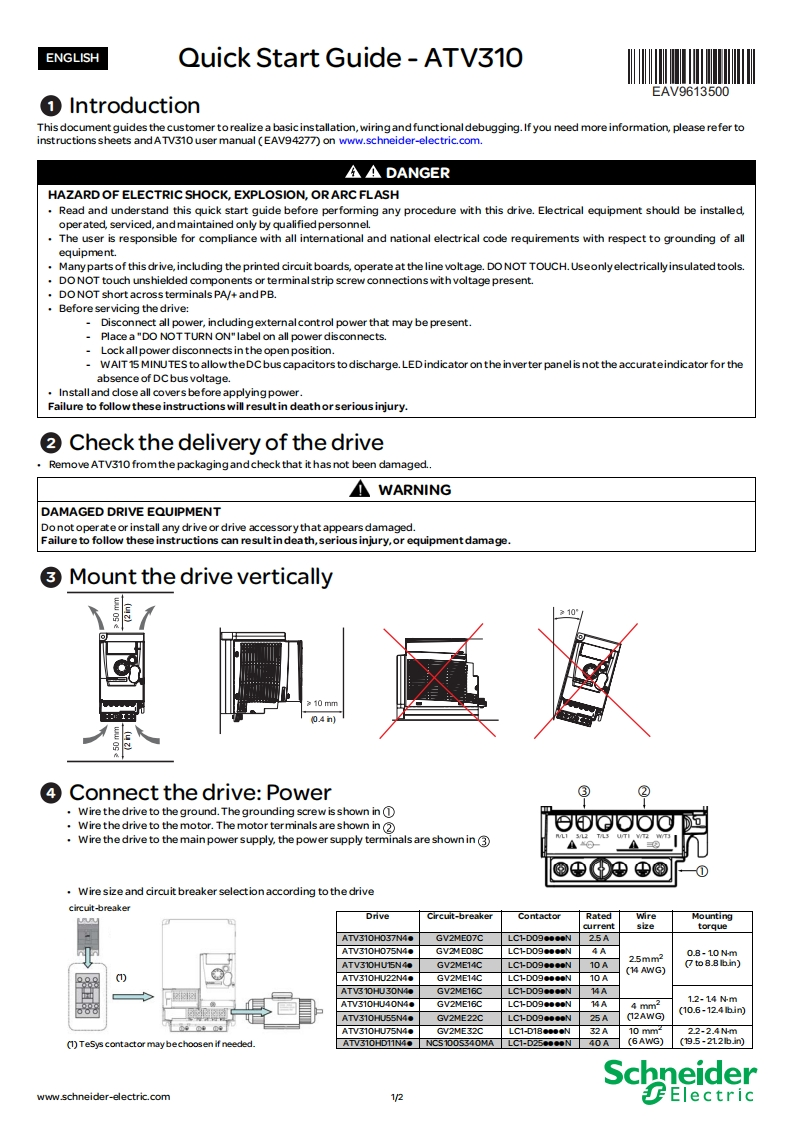
ENGLISHQuick Start Guide-ATV310EAV9613500①IntroductionThis document guides the customer to realize a basic installation,wiring and functional debugging.If you need more information,please refer toinstructions sheets and ATV310 user manual (EAV94277 on www.schneider-electric.com.AA DANGERHAZARD OF ELECTRIC SHOCK,EXPLOSION,OR ARC FLASHRead and understand this quick start guide before performing any procedure with this drive.Electrical equipment should be installed,operated,serviced,and maintained only by qualified personnel.The user is responsible for compliance with all international and national electrical code requirements with respect to grounding of allequipment.Mamy parts of this drive,including the printed circuit boards,operate at the line voltage.DO NOT TOUCH.Useonlyelectricallyinsulated tools.DO NOT touch unshielded components or terminal strip screw connections with voltage present.DO NOT short acrossterminals PA/+andPB.Before servicing the drive:Disconnect all power,including external control power that may be present.。Place a "DO NOTTURN ON"label on all power disconnects.Lock all power disconnects in the open position.WAIT15 MINUTES to allowtheDC bus capacitors to discharge.LEDindicator on the inverter panel is not the accurateindicator for theabsence of DCbus voltage.Install and close all covers before applying power.Failure to follow these instructions will result in deathor serious injury.2 Check the delivery of the driveRemove ATV310 fromthe packaging and check that it has not been damaged.WARNINGDAMAGED DRIVE EQUIPMENTDo not operate or install any drive or drive accessory that appears damaged.Failure to follow these instructions can result in death,serious injury,or equipmentdamage.3 Mount the drive vertically品包210mm04n)4Connect the drive:PowerWire the drive to the ground.The grounding screw is shown in(1Wire the drive to the motor.The motor terminals are shown in 2Wire the drive to the main power supply,the power supply terminals are shown in3Wire size and circuit breaker selection according to the drivecircuit-breakerDriveCircuit-breakerContactorRatedWireMountingcurrentsizetorqueATV310H037N40GV2ME07CLC1-D09eeeeN25AATV310H075N4.GV2MEOBCLC1-D09●0##N4A25mm208-10mATV310HU15N4GV2ME14CLC1-D09eeeeN10A7 to 8.B Ib.in)(14 AWG)0)AV31OHU22N4●GV2ME14CLC1-D09ee.eN10AATV310HU30N4eGV2ME16CLC1-D09eeeeN14AAV31OHU4ON4GV2ME16CLC1-D090#N14A4 mm212-14m(10.6-124bin)ATV310HU55N4.GV2ME22CLC1-D09eeeeN25AI2AW⑨ATV310HU75N4.GV2ME32CLC1-D80N32A10mm22-2.4Nm(1)TeSys contactor may bechoosen if needed.ATV310HD11N4 NCS1005340MALC1-D25●●●●N40A(6AWG)(195-212bn)Schneiderwww.schneider-electric.com1V2


请登录后查看评论内容