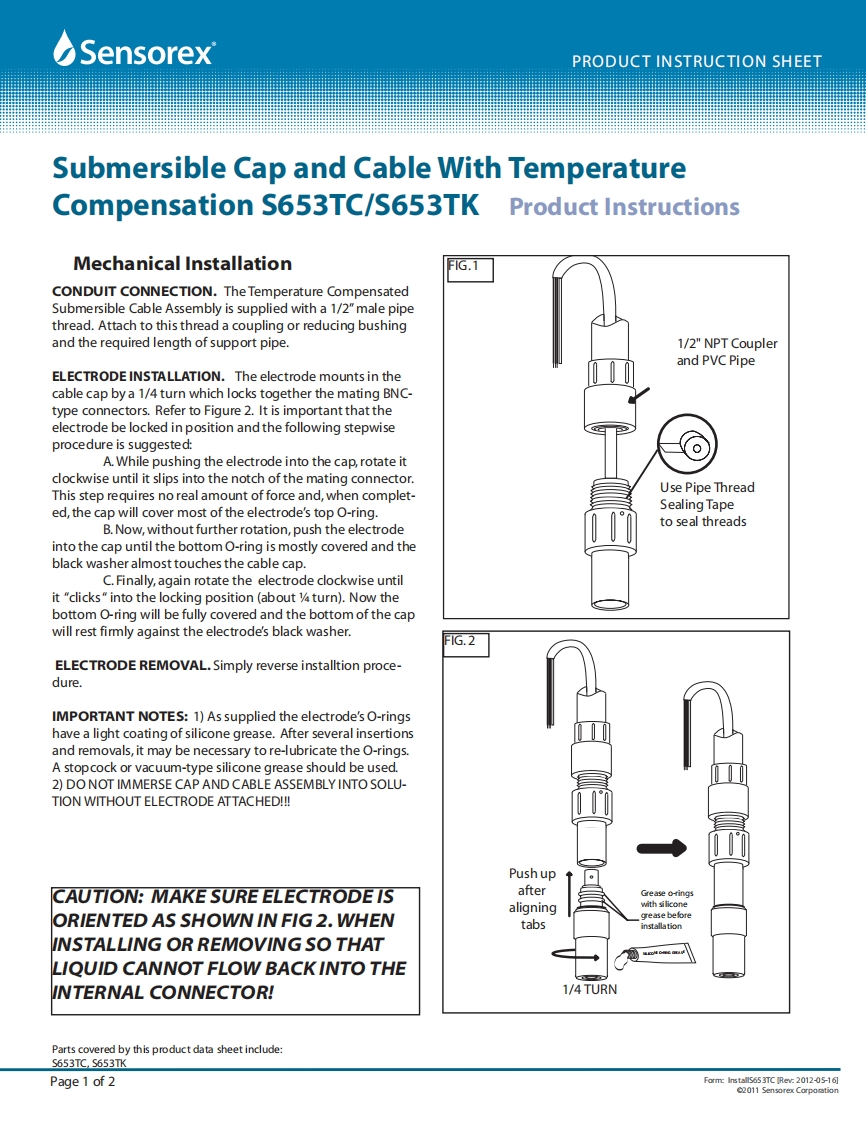
SensorexPRODUCT INSTRUCTION SHEETSubmersible Cap and Cable With TemperatureCompensation S653TC/S653TKProduct InstructionsMechanical Installation1G.1CONDUIT CONNECTION.The Temperature CompensatedSubmersible Cable Assembly is supplied with a 1/2"male pipethread.Attach to this thread a coupling or reducing bushingand the required length of support pipe.1/2"NPT Couplerand PVC PipeELECTRODE INSTALLATION.The electrode mounts in thecable cap by a 1/4 turn which locks together the mating BNC-type connectors.Refer to Figure 2.It is important that theelectrode be locked in position and the following stepwiseprocedure is suggested:A.While pushing the electrode into the cap,rotate itclockwise until it slips into the notch of the mating connector.This step requires no real amount of force and,when complet-Use Pipe Threaded,the cap will cover most of the electrode's top O-ring.Sealing TapeB.Now,without further rotation,push the electrodeto seal threadsinto the cap until the bottom O-ring is mostly covered and theblack washer almost touches the cable cap.C.Finally,again rotate the electrode clockwise untilit "clicks"into the locking position(about V turn).Now thebottom O-ring will be fully covered and the bottom of the capwill rest firmly against the electrode's black washer.F1G.2ELECTRODE REMOVAL.Simply reverse installtion proce-dure.IMPORTANT NOTES:1)As supplied the electrode's O-ringshave a light coating of silicone grease.After several insertionsand removals,it may be necessary to re-lubricate the O-rings.A stopcock or vacuum-type silicone grease should be used.2)DO NOT IMMERSE CAP AND CABLE ASSEMBLY INTO SOLU-TION WITHOUT ELECTRODE ATTACHED!!!Push upCAUTION:MAKE SURE ELECTRODE ISafterGrease o-ringsaligningwith siliconeORIENTED AS SHOWN IN FIG 2.WHENgrease be foretabsinstallationINSTALLING OR REMOVING SO THATLIQUID CANNOT FLOW BACKINTO THEINTERNAL CONNECTOR!1/4 TURNParts covered by this product data sheet include:S653TC,S653TKPage 1 of 2Form:InstallS653TC [Rev:2012-05-16]2011 Sensorex Corportion

请登录后查看评论内容