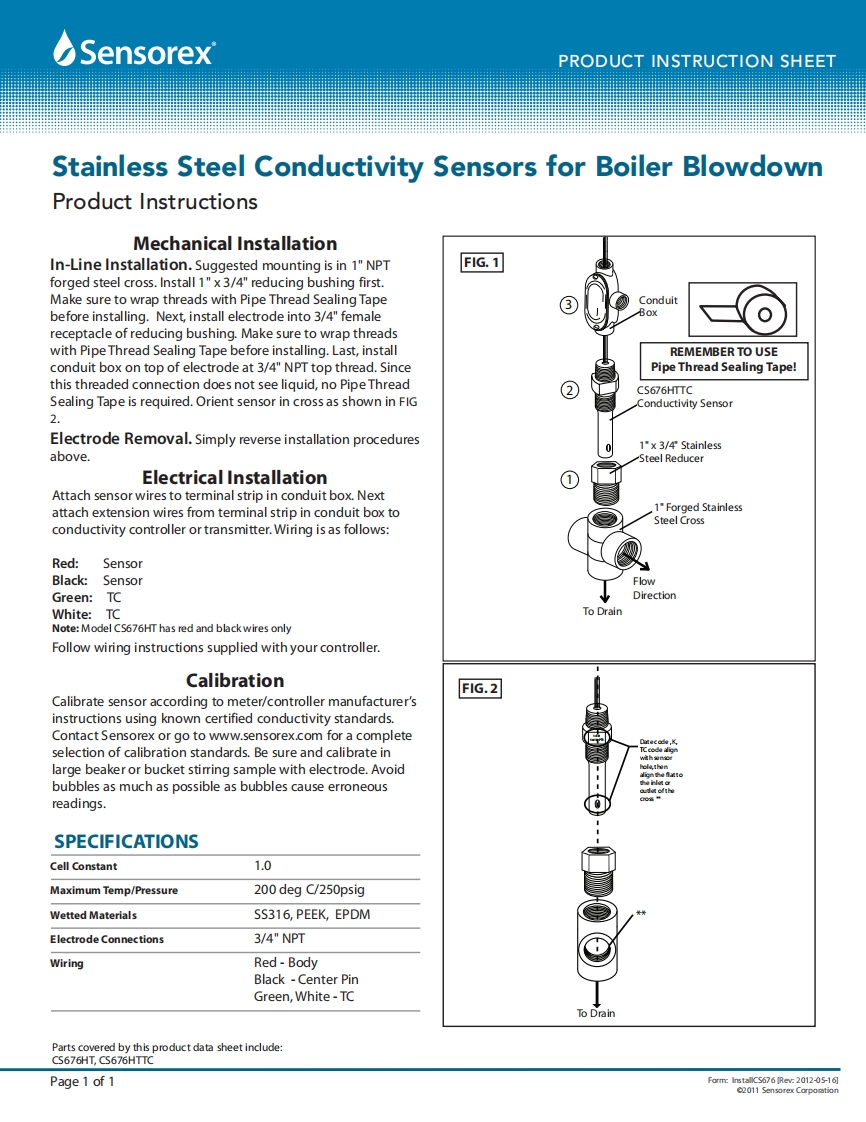
☑SensorexPRODUCT INSTRUCTION SHEETStainless Steel Conductivity Sensors for Boiler BlowdownProduct InstructionsMechanical InstallationIn-Line Installation.Suggested mounting is in 1"NPTFIG.1forged steel cross.Install 1"x 3/4"reducing bushing first.Make sure to wrap threads with Pipe Thread Sealing TapeConduitbefore installing.Next,install electrode into 3/4"femaleBoxreceptacle of reducing bushing.Make sure to wrap threadswith Pipe Thread Sealing Tape before installing.Last,installREMEMBER TO USEconduit box on top of electrode at 3/4"NPT top thread.SincePipe Thread Sealing Tape!this threaded connection does not see liquid,no Pipe Thread2CS676HTTCSealing Tape is required.Orient sensor in cross as shown in FIGConductivity Sensor2Electrode Removal.Simply reverse installation procedures01"x 3/4 Stainlessabove.Steel ReducerElectrical InstallationAttach sensor wires to terminal strip in conduit box.Nextattach extension wires from terminal strip in conduit box to1"Forged StainlessSteel Crossconductivity controller or transmitter.Wiring is as follows:Red:SensorBlack:SensorFlowGreen:TCDirectionWhite:TCTo DrainNote:Model CS676HT has red and black wires onlyFollow wiring instructions supplied with your controller.CalibrationFIG.2Calibrate sensor according to meter/controller manufacturer'sinstructions using known certified conductivity standards.Contact Sensorex or go to www.sensorex.com for a completeselection of calibration standards.Be sure and calibrate inlarge beaker or bucket stirring sample with electrode.Avoidbubbles as much as possible as bubbles cause erroneousreadings.SPECIFICATIONSCell Constant1.0Maximum Temp/Pressure200 deg C/250psigWetted MaterialsSS316,PEEK,EPDMElectrode Connections3/4"NPTWiringRed-BodyBlack-Center PinGreen,White-TCTo DrainParts covered by this product data sheet include:CS676HT,CS676HTTCPage 1 of 1Form:InstallCS676 [Rev:2012-05-16]2011 Sensorex Corporstion

请登录后查看评论内容