
第1页 / 共4页
试读已结束,还剩3页,您可下载完整版后进行离线阅读
THE END
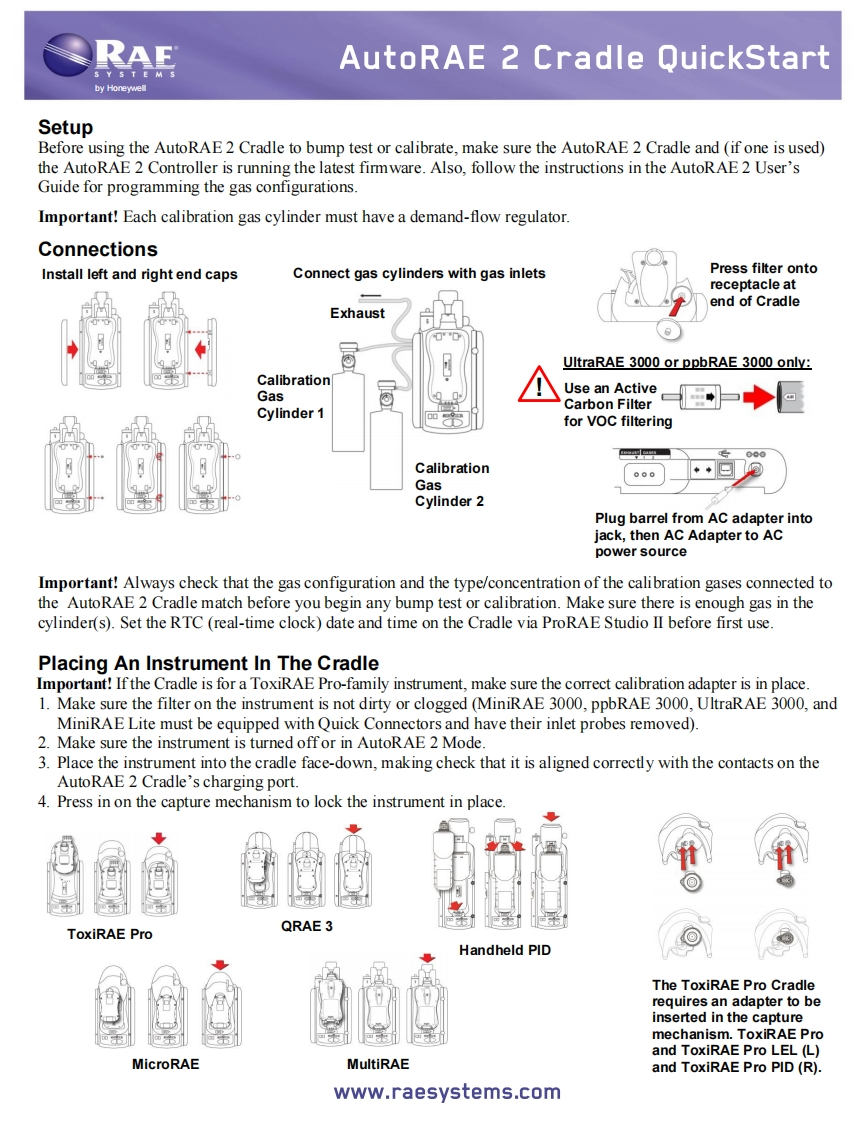
RAEAutoRAE 2 Cradle QuickStartS Y S T E M Sby HoneywellSetupBefore using the AutoRAE 2 Cradle to bump test or calibrate,make sure the AutoRAE 2 Cradle and (if one is used)the AutoRAE 2 Controller is running the latest firmware.Also,follow the instructions in the AutoRAE 2 User'sGuide for programming the gas configurations.Important!Each calibration gas cylinder must have a demand-flow regulator.ConnectionsInstall left and right end capsConnect gas cylinders with gas inletsPress filter ontoreceptacle atend of CradleExhaustUltraRAE 3000 or ppbRAE 3000 only:CalibrationGasUse an ActiveCarbon FilterCylinder 1for VOC filtering4Calibration000GasCylinder 2Plug barrel from AC adapter intojack,then AC Adapter to ACpower sourceImportant!Always check that the gas configuration and the type/concentration of the calibration gases connected tothe AutoRAE 2 Cradle match before you begin any bump test or calibration.Make sure there is enough gas in thecylinder(s).Set the RTC (real-time clock)date and time on the Cradle via ProRAE Studio II before first usePlacing An Instrument In The CradleImportant!If the Cradle is for a ToxiRAE Pro-family instrument,make sure the correct calibration adapter is in place1.Make sure the filter on the instrument is not dirty or clogged (MiniRAE 3000,ppbRAE 3000,UltraRAE 3000,andMiniRAE Lite must be equipped with Quick Connectors and have their inlet probes removed)2.Make sure the instrument is turned offor in AutoRAE 2 Mode.3.Place the instrument into the cradle face-down,making check that it is aligned correctly with the contacts on theAutoRAE 2 Cradle's charging port.4.Press in on the capture mechanism to lock the instrument in place.QRAE 3ToxiRAE ProHandheld PIDThe ToxiRAE Pro Cradlerequires an adapter to beinserted in the capturemechanism.ToxiRAE Proand ToxiRAE Pro LEL (L)MicroRAEMultiRAEand ToxiRAE Pro PID(R).www.raesystems.com

请登录后查看评论内容